A camera bag can hold the intended kit yet be inconvenient at the moment someone needs the camera. An OEM brief therefore needs two connected decisions: how the user carries the bag between locations and how they open it at the working location. This guide helps buyers compare opening concepts and review a sample. It does not describe a tested Guangshun model or promise protection, weather resistance or a particular delivery time.
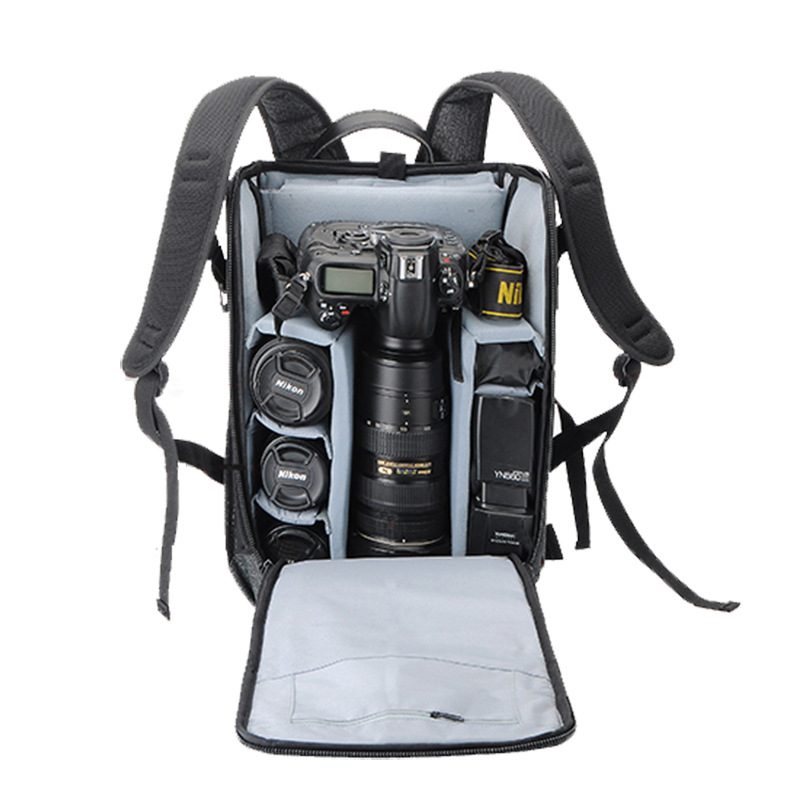
The cover photograph is an existing camera-backpack reference with a full-panel opening. It does not show or validate every opening option discussed below.
Describe the real access moment
Ask the intended user what happens before the first photograph. Do they set the bag on a stable surface and open the entire equipment area, or do they need one item while standing? Does the bag travel mainly as a backpack, a shoulder bag or another carrying format? These questions matter more than a generic request for quick access.
Write down a short sequence: carry, stop, remove or reposition the bag, open it, retrieve the item, close it and move again. Note whether the camera is stored with a lens attached, and which accessory is needed next. The equipment inventory and divider dimensions belong in a separate layout record; our camera bag divider planning guide covers that step. Here the focus is the path to the contents.
Compare openings against the sequence
No opening mode is automatically best. Use the following as questions for design and sample review, not as claims about a finished product.
| Opening concept | Situation worth exploring | Buyer question for the sample |
|---|---|---|
| Full-panel opening | Reviewing or rearranging several items after setting the bag down | Is there enough clear space to open the panel in the intended setting? |
| Top opening | Retrieving a frequently used item from an upright bag | Which items are visible and reachable without moving the others? |
| Side opening | Accessing a selected area while the bag is repositioned | Can the intended user control the bag and opening in the planned carrying posture? |
A larger opening may expose more of the kit but require more space and a different bag position. A smaller opening may help isolate one item but can make other items harder to inspect. On a sample, check these trade-offs with the complete kit packed, not an empty bag.
Map the carrying-to-opening transition
The brief should state exactly how the bag moves from carrying position to access position. For a backpack concept, mark whether the user removes it completely before opening or expects to rotate it into reach. For a shoulder-carried concept, mark whether it stays on the shoulder or is placed on a surface. If the same bag must support two modes, evaluate each mode separately.
Do not approve a side-access sketch merely because the zipper is in the correct place. Ask the intended user to follow the complete movement with the sample and the actual kit. Record whether straps, handles or loose closures interfere with opening, retrieval or closing. If the bag has to be set down, specify the expected orientation and available space. These are usability observations; they are not evidence of protective performance.
Use one repeatable sample worksheet
Choose two or three tasks that match the buyer's intended use. For each task, record the starting carrying mode, the item to retrieve, the opening used and what else had to be moved. A concise worksheet keeps design feedback specific.
- Pack the sample with the identified camera, lens and accessory set in the agreed orientation. Photograph the starting arrangement.
- Ask a user to carry the bag as planned, stop and retrieve the first item without coaching. Note any change in grip or bag position.
- Repeat for a second item in a different location. Record whether another item or divider had to be moved first.
- Return everything, close the bag and repeat the sequence in the other proposed carrying mode, if one is required.
- Give each issue a location and task number. Request a specific change, then repeat the same tasks on the revised sample.
If a result depends on user preference, gather observations from the actual target users before choosing a layout. A drawing alone cannot settle whether the sequence feels practical. Keep any claims about impact, weather or other performance separate and require an agreed assessment method and evidence for those claims.
Send the decision to the factory clearly
An effective custom camera bag brief includes the equipment inventory, intended carrying mode, access sequence, preferred opening concept, sample worksheet and unresolved questions. Show which choices are already approved and which require factory feedback. Include your intended order quantity and destination market for project discussion without assuming fixed commercial terms.
Review the custom camera bag references and OEM / ODM process. When the access sequence is clear, contact Guangshun Bags with your kit list and opening sketch to discuss a sample.